Patriotic No-Bake Cheesecake Jars – A 4th of July Delight
Looking for the perfect 4th of July treat that’s both delicious and easy to make? Look no further than these Patriotic No-Bake Cheesecake Jars!
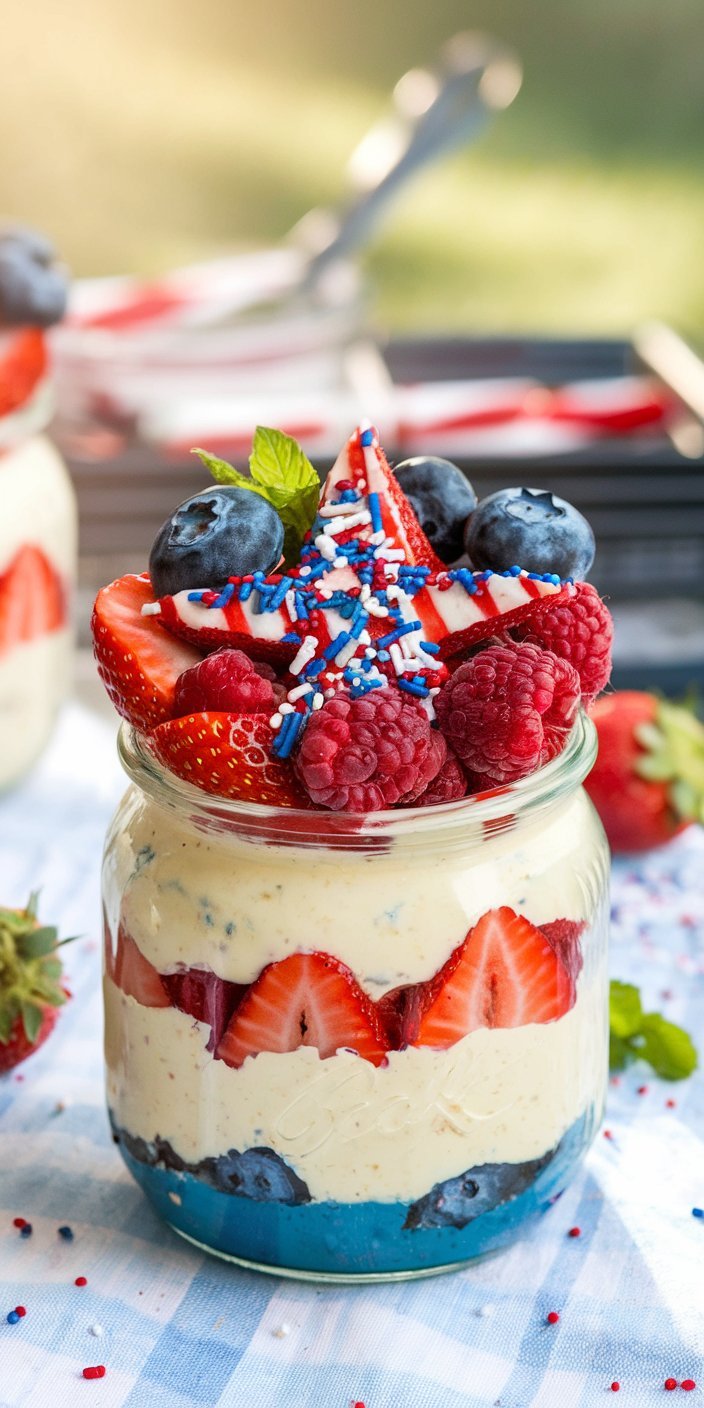
These adorable individual servings are packed with layers of creamy, tangy cheesecake filling, a crunchy graham cracker crust, and topped with fresh, vibrant red, white, and blue berries. The best part? They’re no-bake! You can make them ahead of time and keep them chilled until it’s time to enjoy.
Whether you’re having a BBQ, a picnic, or a small gathering, these cheesecake jars will bring the perfect pop of color to your 4th of July festivities. Ready to dive in? Let’s make this simple yet impressive dessert!
Why You’ll Love These Patriotic No-Bake Cheesecake Jars
- Festive and Fun: These individual-sized cheesecake jars are a visually stunning treat with red, white, and blue layers. The colorful toppings of berries and the graham cracker crust make these perfect for any 4th of July celebration.
- No-Bake Simplicity: No oven required! These cheesecake jars come together in minutes and chill in the fridge, making them a hassle-free dessert that anyone can make.
- Perfectly Portion-Controlled: Because they’re served in jars, each person gets their own individual portion. No need for cutting slices—just grab a spoon and dig in!
- Creamy and Tangy: The smooth and creamy cheesecake filling balances perfectly with the crunchy graham cracker crust and fresh berries, making each bite feel indulgent and refreshing.
- Easy to Customize: You can easily make these jars your own by adding different toppings like chocolate chips, caramel sauce, or even a dash of lemon zest to the filling for a unique twist.
Ingredients:
For the Crust:
- 1½ cups graham cracker crumbs
- 3 tablespoons sugar
- ¼ teaspoon cinnamon
- 6 tablespoons unsalted butter, melted
For the Cheesecake Filling:
- 2 cups heavy cream
- 8 oz cream cheese, softened
- 1 cup powdered sugar
- 1 teaspoon vanilla extract
- 2 tablespoons lemon juice (optional, for extra tang)
For the Topping:
- 1 cup strawberries, hulled and sliced
- 1 cup blueberries
- 1 cup raspberries
- Fresh mint leaves (optional, for garnish)
- Red, white, and blue sprinkles (optional, for added decoration)
Step-By-Step Instructions:

Prep Time: 20 minutes
Chill Time: 2 hours (or overnight)
Servings: 6-8 (depending on jar size)
1. Prepare the Crust:
In a medium bowl, combine the graham cracker crumbs, sugar, and cinnamon. Add the melted butter and stir until the crumbs are well-coated and the mixture holds together when pressed.
Spoon the crust mixture into the bottoms of individual jars or glasses. Press down gently to form a compact, even layerat the bottom of each jar.
2. Make the Cheesecake Filling:
In a large mixing bowl, beat the cream cheese with a hand mixer until smooth and creamy. Add the heavy cream, powdered sugar, and vanilla extract. Beat on low to combine, then increase the speed to high and whip for about 2-3 minutes, until the mixture is thick and fluffy.
Add the lemon juice (if using) and mix until fully incorporated. The filling should be smooth, creamy, and able to hold its shape.
3. Assemble the Jars:
Spoon the cheesecake filling into the jars, layering it on top of the graham cracker crust. You can use a spoon or a piping bag for cleaner presentation. Fill each jar about two-thirds full.
Use a spoon or spatula to smooth the top of the cheesecake layer, making it even and neat.
4. Add the Berries:
Top each jar with a handful of fresh berries—strawberries, blueberries, and raspberries—arranging them in a festive red, white, and blue pattern. You can add more or less depending on how much berry topping you want.
For a final touch, add a few mint leaves and some sprinkles if desired.
5. Chill and Serve:
Cover the jars with lids or plastic wrap and place them in the fridge for at least 2 hours, or overnight for the best results. This allows the cheesecake to set and the flavors to meld together.
Serve chilled and enjoy the creamy, berry-packed goodness!
Variations of This Recipe:
- Chocolate Cheesecake Filling: For a twist, you can add cocoa powder or melted chocolate to the cheesecake filling for a chocolate version. Layer it with a chocolate graham cracker crust for extra indulgence.
- Peach or Mango Trifles: Switch out the berries for sliced peaches or mango for a tropical take on the trifle.
- Boozy Option: Add a splash of vanilla extract or even a little liquor like amaretto or Kahlúa to the cheesecake filling for an adult version of these jars.
- Lemon Cheesecake: Add extra lemon zest to the cheesecake filling for a tangy, refreshing twist. This works especially well for summer gatherings.
Expert Tips About This Recipe:
- Use Full-Fat Cream Cheese: For the creamiest, smoothest texture, use full-fat cream cheese. Light cream cheese will not whip as well and can make the filling too runny.
- Let the Cheesecake Set: Let the cheesecake chill for at least 2 hours. This allows the layers to set and the flavors to blend. It’s even better if you can let it sit overnight.
- Layering Tip: When adding the berries, use a mix of whole berries and sliced berries for texture. Sliced strawberries work well for creating a layered look and adding more vibrant color.
- Make Ahead: These jars are perfect for making ahead. Prepare them in advance and store them in the fridge until you’re ready to serve. They’ll keep for up to 3 days in the refrigerator.
FAQs
Q: Can I make these ahead of time?
A: Yes! These cheesecakes are perfect for making ahead. Prepare the jars and refrigerate them for at least 2 hours or overnight before serving.
Q: Can I use a different type of crust?
A: Absolutely! You can use crushed chocolate cookies (like Oreos) or even shortbread cookies for a different flavor. Just make sure they’re crushed finely and mixed with melted butter to hold together.
Q: How do I store leftovers?
A: Store any leftover cheesecake jars in the fridge with a tight-fitting lid for up to 3 days. They’re perfect for an easy snack later!
Q: Can I use frozen berries?
A: Fresh berries work best for this recipe, but you can use thawed frozen berries if fresh isn’t available. Just make sure to drain them well before adding them to avoid excess moisture.
Patriotic No-Bake Cheesecake Jars
Ingredients
Method
- In a medium bowl, mix the graham cracker crumbs, sugar, and cinnamon. Stir in the melted butter until combined. Spoon the mixture into individual jars or glasses and press down to form a compact layer.
- Beat the cream cheese in a large bowl until smooth. Add the heavy cream, powdered sugar, and vanilla extract. Beat on low, then increase the speed and whip for about 2-3 minutes until the mixture thickens and becomes fluffy. Add the lemon juice (if using) and mix until smooth.
- Spoon the cheesecake filling on top of the graham cracker crust in each jar, smoothing it out with a spatula. Leave space at the top for the berry topping. Chill the jars for at least 2 hours to allow the cheesecake to set.
- Before serving, top each jar with a mix of fresh strawberries, blueberries, and raspberries arranged in a patriotic pattern. Garnish with a few mint leaves and red, white, and blue sprinkles for an extra festive touch.
- Serve the jars chilled and enjoy this refreshing, no-bake dessert!