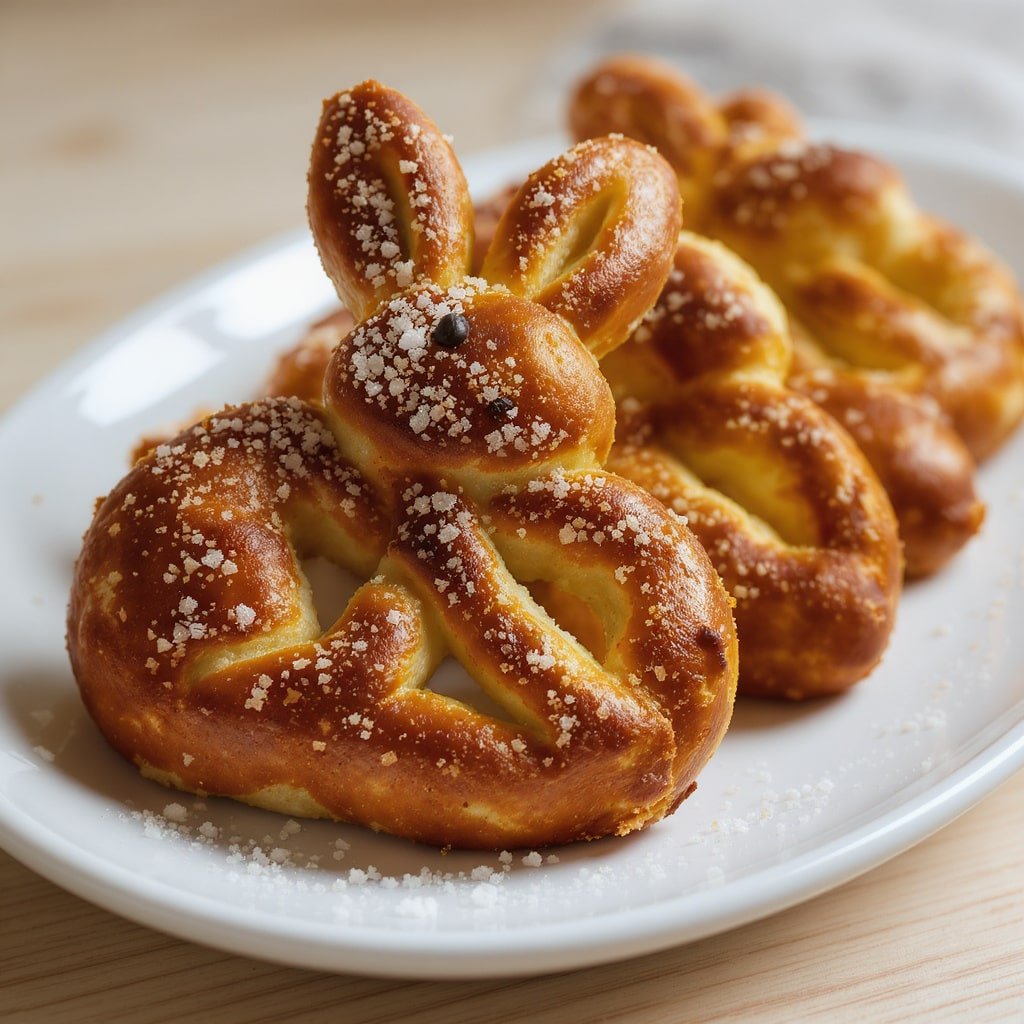
Easter Bunny Soft Pretzels
Easter Bunny Soft Pretzels are the kind of festive treat that instantly makes a holiday table feel special. Soft, fluffy on the inside, lightly chewy on the outside, and shaped like adorable bunny faces, these pretzels are as fun to make as they are to eat. They strike the perfect balance between playful presentation and classic homemade flavor.

What makes these Easter Bunny Soft Pretzels especially appealing is how approachable the recipe is. You don’t need advanced baking skills or specialty equipment. With simple pantry ingredients and a straightforward dough, you can create bakery-style soft pretzels right at home.
These pretzels are ideal for Easter brunch, spring parties, classroom celebrations, or a cozy baking afternoon with kids. They’re lightly sweet but neutral enough to pair with both sweet and savory toppings.
This guide walks you through every step, from mixing the dough to shaping bunny faces and baking them to golden perfection. By the end, you’ll have a foolproof Easter recipe you can confidently make year after year.
Why You’ll Love This Recipe
- Soft, fluffy texture with a classic chewy pretzel crust
- Festive bunny shape that’s perfect for Easter gatherings
- Simple ingredients you likely already have on hand
- Beginner-friendly steps with no complicated techniques
- Easy to customize with sweet or savory toppings
- Make-ahead and freezer-friendly for stress-free holidays
Ingredients
- Warm water
- Active dry yeast
- Granulated sugar
- Unsalted butter
- All-purpose flour
- Salt
- Baking soda
- Egg
- Coarse sugar or pretzel salt
Ingredients Guide (Ingredient Breakdown)
Warm Water
Warm water activates the yeast and helps the dough rise properly. The temperature should feel warm to the touch, not hot, to avoid killing the yeast.
Active Dry Yeast
Yeast is what gives these pretzels their soft, airy texture. If your yeast doesn’t foam after blooming, it’s best to start over with fresh yeast.
Granulated Sugar
Sugar feeds the yeast and adds a subtle sweetness that complements the pretzel flavor. You can substitute honey if needed, but sugar keeps the dough neutral.
Unsalted Butter
Butter adds richness and softness to the dough. Using unsalted butter allows better control over the overall salt level.
All-Purpose Flour
This flour provides the ideal structure for soft pretzels. Bread flour can be used for a slightly chewier texture, but all-purpose flour keeps them tender.
Salt
Salt balances the sweetness and enhances flavor. It also strengthens the dough structure during kneading.
Baking Soda
The baking soda bath is essential for classic pretzel flavor and color. It helps create that signature chewy crust.
Egg
The egg wash gives the pretzels a glossy, golden finish. It also helps toppings stick evenly.
Coarse Sugar or Pretzel Salt
These toppings add texture and visual appeal. Coarse sugar works well for sweet versions, while pretzel salt is perfect for classic flavor.
Step-by-Step Instructions
- In a large mixing bowl, combine warm water, yeast, and sugar.
- Let the mixture sit for 5–10 minutes until foamy and bubbly.
- Stir in melted butter and salt until fully combined.
- Gradually add flour, mixing until a soft dough forms.
- Knead the dough on a floured surface for 5–7 minutes until smooth.
- Place dough in a lightly greased bowl and cover loosely.
- Let the dough rise in a warm spot for about 1 hour, until doubled.
- Preheat oven and line baking sheets with parchment paper.
- Divide dough into equal portions for uniform pretzels.
- Roll each piece into a long rope, about 18–20 inches long.
- Shape each rope into a bunny face with looped ears.
- Bring water and baking soda to a gentle boil.
- Carefully dip each shaped pretzel into the solution for 20–30 seconds.
- Transfer pretzels to prepared baking sheets.
- Brush with egg wash and add desired toppings.
- Bake until golden brown and fully set.
- Cool slightly before serving for best texture.
Variations & Customizations
- Sweet Cinnamon Sugar Pretzels: Brush with butter and coat in cinnamon sugar after baking.
- Chocolate Drizzle Pretzels: Add melted chocolate once cooled for a dessert-style treat.
- Savory Garlic Pretzels: Sprinkle with garlic powder and parmesan before baking.
- Vegan Option: Use plant-based butter and skip the egg wash.
- Gluten-Free Version: Use a gluten-free all-purpose baking blend designed for yeast doughs.
- Stuffed Pretzels: Add chocolate chips or cream cheese inside for a surprise filling.
Serving Guide (Detailed)
Easter Brunch Table
Serve warm alongside fruit salad, egg dishes, and coffee. The bunny shape fits perfectly into a spring brunch spread.
Kids’ Easter Party
Pair with chocolate milk or juice boxes. Add sprinkles or candy eyes for extra fun.
Afternoon Snack
Enjoy plain or with honey butter for a cozy spring snack that feels homemade and comforting.
Holiday Dessert Tray
Serve with chocolate dip, vanilla glaze, or caramel sauce for a sweet ending to Easter dinner.
Make-Ahead Breakfast Treat
Prepare in advance and reheat for a quick, festive breakfast during the holiday weekend.
Spring Bake Sale
These pretzels stand out visually and hold their shape well for display and transport.
Storage & Reheating Guide
Room Temperature
Store in an airtight container for up to 2 days. Keep away from direct heat to maintain softness.
Refrigerator
Refrigerate for up to 5 days. Allow to come to room temperature before reheating.
Freezer
Freeze fully cooled pretzels for up to 2 months. Wrap individually for best results.
Reheating Method
Warm in the oven at a low temperature until soft. Avoid microwaving for too long, as it can make them tough.
Shelf Life Tips
Reheat only what you plan to eat to preserve texture and freshness.
Common Mistakes to Avoid
- Using water that’s too hot: This can kill the yeast and prevent rising.
- Skipping the baking soda bath: This step is essential for authentic pretzel flavor.
- Over-kneading the dough: Too much kneading can make pretzels dense.
- Under-proofing: Dough needs enough time to rise for a fluffy interior.
- Over-baking: Watch closely to avoid dry, hard pretzels.
Expert Tips for Best Results
- Measure flour accurately to avoid a dry dough.
- Let dough rest briefly if it resists shaping.
- Shape bunny ears slightly thicker to prevent over-browning.
- Use parchment paper to avoid sticking and uneven bottoms.
- Bake one tray at a time for consistent results.
FAQs
Can I make these ahead of time?
Yes, they’re perfect for making ahead and reheating before serving.
Are these pretzels sweet or savory?
They’re mildly sweet and work well with both sweet and savory toppings.
Can kids help make this recipe?
Absolutely. Shaping the bunny faces is fun and kid-friendly.
Do I need a stand mixer?
No, this dough can be mixed and kneaded by hand easily.
Why is the baking soda bath important?
It creates the chewy texture and classic pretzel flavor.
Can I freeze unbaked pretzels?
Yes, freeze after shaping and bake directly from frozen with extra time.
How do I keep them soft?
Store airtight and reheat gently before serving.
What toppings work best?
Coarse sugar, pretzel salt, cinnamon sugar, or chocolate drizzle all work well.
Final Thoughts / Conclusion
Easter Bunny Soft Pretzels are a fun, festive way to bring homemade baking into your holiday celebration. They’re approachable for beginners, easy to customize, and guaranteed to impress both kids and adults.
With soft centers, golden crusts, and adorable bunny shapes, these pretzels feel special without being complicated.
Whether you’re baking for Easter brunch, a spring party, or a make-ahead holiday treat, this recipe delivers reliable, delicious results. Give it a try, save it for later, and share it with friends and family who love creative holiday baking.
If you make these pretzels, leave a comment with your favorite topping or variation.
Easter Bunny Soft Pretzels
Ingredients
Method
- In a large bowl, mix warm water, yeast, and sugar. Let sit 5–10 minutes until foamy.
- Stir in melted butter and salt. Gradually add flour until a soft dough forms.
- Knead dough on a floured surface for 5–7 minutes until smooth and elastic.
- Place dough in a greased bowl, cover, and let rise for 1 hour or until doubled.
- Preheat oven to 425°F (220°C) and line baking sheets with parchment paper.
- Divide dough into equal portions and roll each into a long rope.
- Shape ropes into bunny faces with looped ears.
- Bring a large pot of water to a boil and add baking soda carefully.
- Dip each pretzel into the water bath for 20–30 seconds, then transfer to baking sheet.
- Brush with egg wash and sprinkle with coarse sugar or pretzel salt.
- Bake for 12–15 minutes until golden brown.
- Cool slightly before serving.