Soft Christmas Peppermint Recipe (Melt-in-Your-Mouth Holiday Candy)
There’s something about peppermint that instantly says “Christmas.” Cool, creamy, and refreshingly sweet, it’s the flavor that turns an ordinary day into a winter celebration.
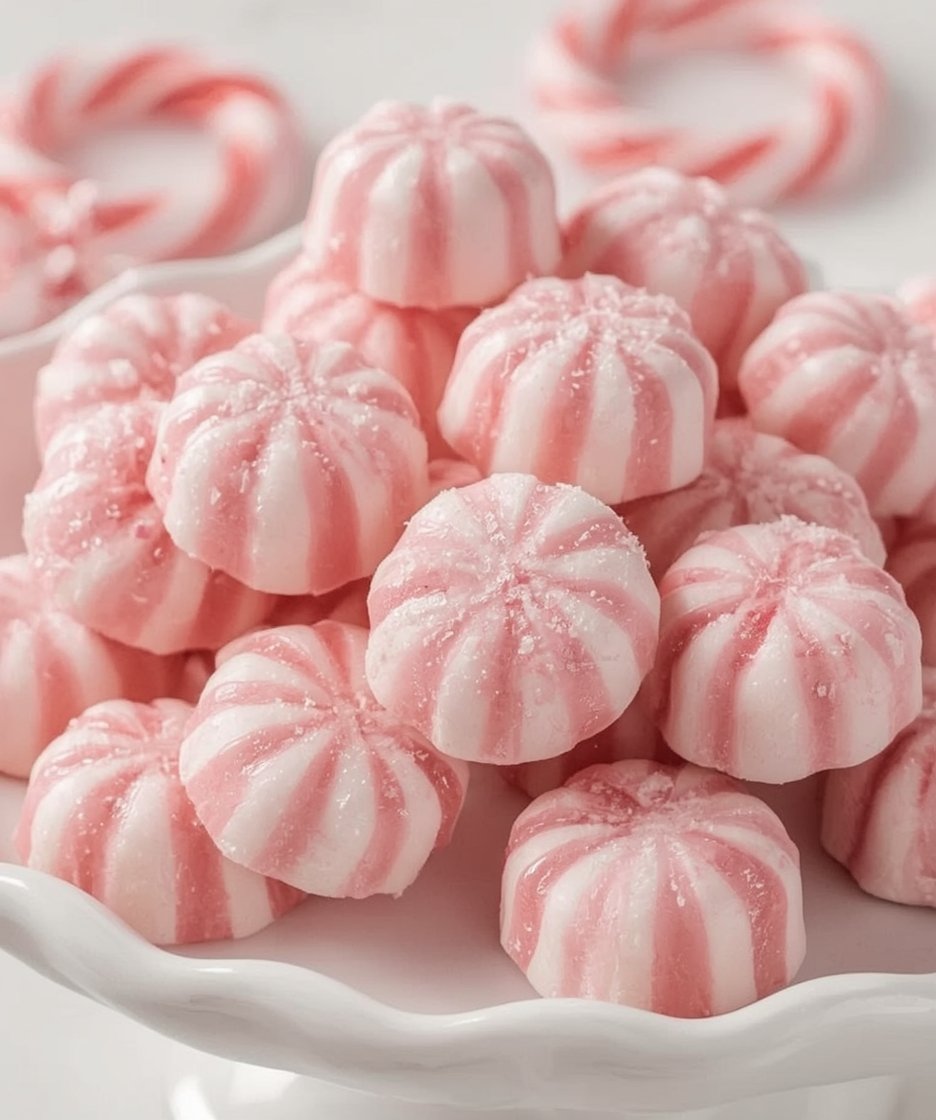
These Soft Christmas Peppermints capture that magic in every bite — smooth, melt-in-your-mouth candies that look as festive as they taste. With just a few simple ingredients and no baking required, they’re the perfect homemade treat for the holiday season.
Whether you’re preparing goodie bags, filling gift tins, or decorating dessert tables, these pastel or candy-cane–striped mints add a charming, handcrafted touch to your celebrations.
They’re creamy from the cream cheese, lightly sweet from powdered sugar, and perfectly balanced with peppermint and vanilla. Every piece feels nostalgic — like those old-fashioned butter mints from childhood, but even better. Make a batch, and your kitchen will smell like Christmas morning itself.
❤️ Why This Recipe Works
There’s something timeless about the flavor of peppermint during the holidays — cool, creamy, and just the right amount of sweet. These Soft Christmas Peppermints are like a cross between butter mints and fondant candy — smooth, melt-in-your-mouth, and impossibly festive.
Unlike store-bought mints, these are homemade with cream cheese, which gives them a rich, silky texture that’s never chalky or overly hard. They’re also no-bake, meaning you can whip them up in under 30 minutes — a total win for busy holiday weeks!
Whether you’re filling candy jars, decorating cookie trays, or wrapping them as gifts, this recipe delivers a handcrafted touch that looks beautiful and tastes incredible.
🎅 A Little Holiday Memory
When I was little, Christmas always smelled like peppermint and powdered sugar. My mom and I would make these soft mints every December, lining them on wax paper while Bing Crosby played in the background. The kitchen would turn into a winter wonderland — powdered sugar clouds everywhere!
Even now, that memory is what Christmas feels like to me — warm, cozy, and sweetly nostalgic. If you’ve never made homemade mints before, this is your invitation to start a new family tradition.
🧈 Ingredients You’ll Need
Here’s a quick look at what goes into this peppermint perfection:
- 3 ¾ cups powdered sugar (plus extra for dusting): Gives structure and sweetness.
- 4 oz cream cheese, softened: Adds smoothness and a subtle tang.
- ½ tsp peppermint extract: The star of the show — use pure extract for best flavor.
- ½ tsp vanilla extract: Balances the mint with gentle sweetness.
- Red and green gel food coloring: Optional, but adds festive flair.
- Optional: Crushed candy canes for sparkle and crunch.
💡 Pro Tip: Always use gel coloring — liquid food coloring can thin out your dough.
🥣 Step-by-Step Instructions
1. Beat the Cream Cheese
In a large mixing bowl, beat softened cream cheese until smooth and creamy. This step creates that perfect, silky base.
2. Add Flavor
Mix in peppermint and vanilla extract. Start with small amounts — peppermint extract is strong and can quickly overpower.
3. Add Powdered Sugar
Gradually add powdered sugar, one cup at a time. The texture should become soft, dough-like, and not sticky.
4. Divide & Color
Separate the dough into portions and tint each one with red or green gel coloring. Knead gently until the color is evenly distributed.
5. Shape the Mints
Roll into small ¾-inch balls and flatten slightly using a fork or fingertip. For fancier shapes, use a piping bag with a star tip.
6. Dry the Mints
Set the candies on parchment paper and let them air-dry for 2–3 hours, or overnight for firmer texture.
7. Store Properly
Store your mints in an airtight container at room temperature for up to 2 weeks, or refrigerate for longer freshness.
🎁 How to Serve or Gift These Mints
- Gift Jars: Layer red, white, and green mints in a clear mason jar with a festive ribbon.
- Dessert Boards: Add to cookie trays or charcuterie-style dessert platters.
- After-Dinner Treats: Perfect to serve with coffee or hot cocoa.
- Holiday Parties: Use as table favors or edible décor.
⚠️ Common Mistakes to Avoid
- Overdoing the peppermint: Start with ½ tsp — you can always add more later.
- Sticky dough: Add more powdered sugar gradually until smooth.
- Skipping dry time: Proper drying ensures the candies keep their shape.
- Using liquid colors: Always go for gel to avoid thinning the dough.
🧑🍳 Expert Tips
- For a softer flavor, blend peppermint and vanilla extracts together.
- Dust finished mints with powdered sugar before storing to prevent sticking.
- Add crushed candy canes for texture and sparkle.
- Create “peppermint buttons” by flattening slightly and adding decorative fork marks.
- Keep away from heat or moisture — cool and dry storage is key.
❄️ Storage & Make-Ahead Tips
- Room Temperature: Up to 2 weeks in airtight containers.
- Refrigerator: Up to 1 month for maximum freshness.
- Freezer: Freeze between layers of wax paper for up to 2 months.
- Make-Ahead: These are perfect for prepping early — their flavor even improves after a day or two!
💬 Frequently Asked Questions
Q1: Can I use mint extract instead of peppermint?
Yes, but peppermint provides that unmistakable Christmas flavor.
Q2: How long do they last?
They’ll stay fresh for about 2 weeks at room temperature or 1 month in the fridge.
Q3: Can I make them vegan?
Absolutely — use a dairy-free cream cheese alternative for a vegan-friendly version.
Q4: Can I color them differently?
Yes! Try pastel shades like pink, mint green, or lavender for a softer winter look.
Q5: Can I add toppings?
Definitely — try sprinkles, crushed candy canes, or edible glitter for extra charm.
🌟 Final Thoughts
These Soft Christmas Peppermints are the perfect blend of tradition, simplicity, and sweetness. They’re easy enough for beginners but elegant enough to impress at any holiday gathering. Every bite feels like Christmas nostalgia wrapped in sugar — a little cool, a little creamy, and endlessly festive.
If you’re looking for a simple holiday treat that brings smiles (and smells amazing while you make it), this is the recipe to bookmark.
Soft Christmas Peppermint Recipe
Ingredients
Method
- In a large mixing bowl, beat softened cream cheese until smooth and creamy.
- Mix in peppermint and vanilla extracts until fully combined.
- Slowly add powdered sugar, one cup at a time, until a soft dough forms. It should be smooth and pliable, not sticky.
- Split the dough into portions. Add red and green gel coloring to each, kneading gently until evenly tinted.
- Roll small ¾-inch balls and flatten slightly with a fork or fingertip. For a decorative look, use a piping bag with a star tip.
- Place on parchment paper and let air-dry for 2–3 hours (or overnight for firmer texture).
- Store mints in an airtight container at room temperature for up to 2 weeks or refrigerate for longer freshness.
Notes
- Peppermint Strength: Start with ½ tsp extract and adjust to taste.
- Coloring Tip: Always use gel food coloring to avoid sticky dough.
- Drying Time: Longer drying gives a firmer bite; shorter for softer texture.
- Storage: Keep in a cool, dry place — moisture can soften the candies.
- Decoration: Dust with powdered sugar or sprinkle crushed candy canes before drying.